Blender addons#
This section covers topics about the Blender addons.
Export configuration from Blender#
Once Splash is compiled, a Blender addon is packaged, ready for installation. This addon allows to:
create a draft scene (textured objects + cameras) and export them as a Splash configuration file,
send in real-time, through shmdata, meshes and textures from Blender to Splash.
To install it:
download it from there
uncompress the archive. You will get a zip archive (the addon) and a template directory
open the Blender
User Preferenceswindowselect the
Add-onspanel, thenInstall from File…navigate to the download directory and select
blenderSplash.zipactivate the addon which should appear in the
Usercategory
Note also that you need to have the Numpy Python module to be installed.
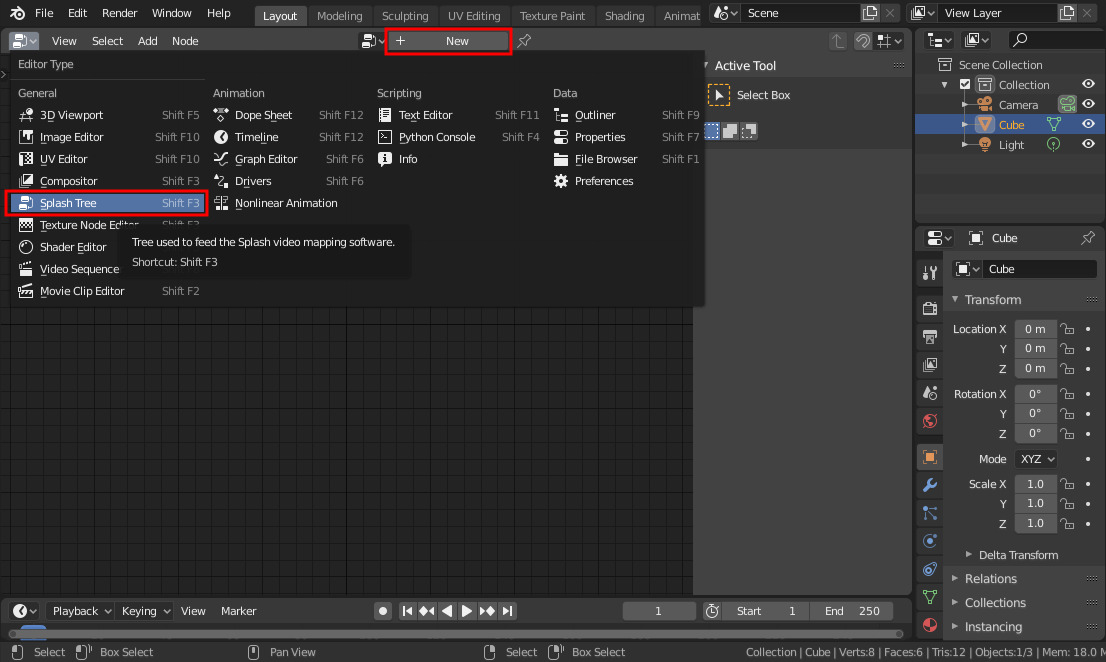
The addon adds a new type of trees accessible through the “Splash Tree” editor type. There, one can create from scratch a new configuration by linking nodes which hold the same parameters as their Splash counterparts. To add a new tree click on “New”.

Blender node view#
To add a node, press Shift + A or use the tool shelf. Only the most useful objects are available in this addon. Basically, it is meant to give access to any kind of configuration, but not to some alternative uses of Splash. The following nodes are available (see the Software architecture pages for reference):
World
GPU
Window
Camera
Object
Probe
Mesh
Image
Gui, which is a special Window dedicated to displaying the user interface. It has to be the first node linked to the first Scene of the configuration.
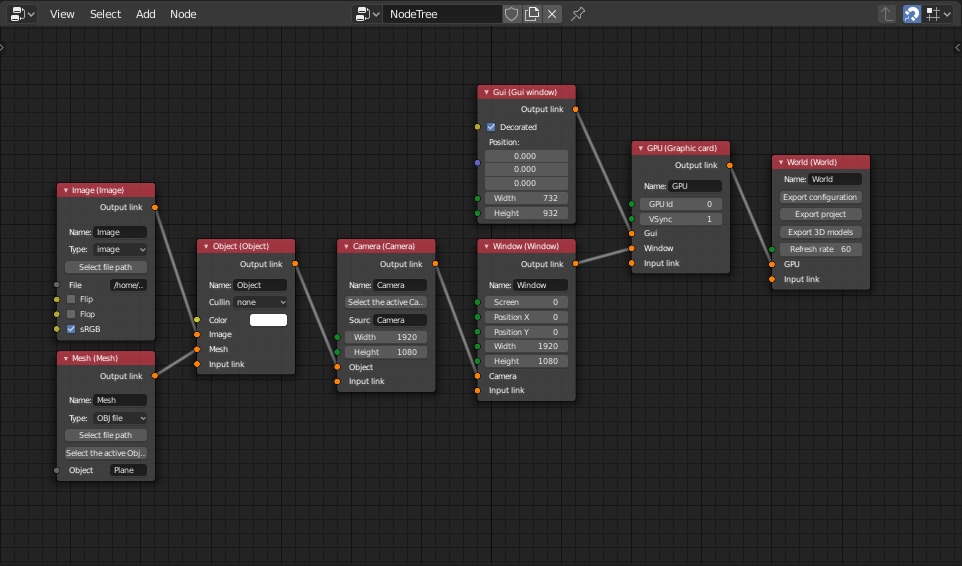
Any configuration has to have one World node, at least one Scene, one Window and one Camera. It also needs one Object, Image and Mesh to have something to project. The simplest (useful) configuration then looks like this:

Simplest configuration#
Once the configuration is complete, the exportation is done through the “Export configuration” button of the World node. Note that there can be multiple Word nodes, allowing for multiple configurations to be held in a single tree. If a Blender mesh has been selected through a Mesh node, it will be exported as an OBJ file. And if a Blender camera has been selected through a Camera node, its parameters (intrinsics and extrinsics) will be used during the export.
You can also export only a part of the configuration, more precisely only data related to images and 3D models, through the “Export project” button of the World node. This allows for changing the projection surface and the projected media, while keeping the calibration. In practice, the user has to load a configuration file, then a project file from the Splash GUI.
Laatly, it is also possible to export only the 3D models through the “Export 3D models” button. This is useful as Splash uses specific OBJ export parameters, and it exports all 3D models at once.
Send meshes live from Blender to Splash#
Another useful addon which can be combined with Splash is the shmdata addon. Shmdata is a library which allows for sharing memory buffers between software, and the shmdata addon brings this capability to Blender. More specifically it allows for sharing meshes from Blender to Splash, so that the user can modify the projection surface in real-time.
To install it, you need to first need to install the shmdata library if it’s not already the case. Refer to shmdata’s documentation for this. Then you can install the shmdata Blender addon by following its documentation.
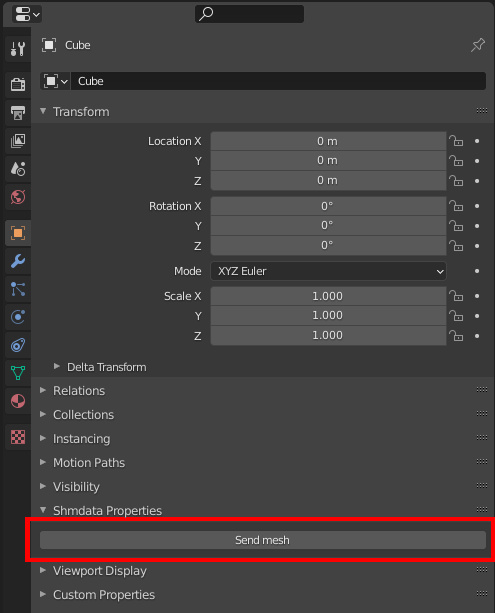
Once installed in Blender you should see an additionnal section in the
Object properties when having a 3D object selected:
Shmdata properties. This section has a single button, Send mesh,
which will send the current object through the shared memory. Any
modification to the 3D mesh is then sent in real-time to any client
software connected to the shmdata.

Blender shmdata addon#
For example when sending the default cube, a shared memory socket will
be created in the filesystem with the path
/tmp/blender_shmdata_mesh_Cube. You can check that frames are sent
correctly with the following command:
sdflow /tmp/blender_shmdata_mesh_Cube
You should get something which looks like this when moving the default cube around:
connected: type application/x-polymesh
0    size: 896    data: 3F8000003F80000000000006000000...
1    size: 896    data: 3F8000003F80000000000006000000...
2    size: 896    data: 3F80E7C33F80683400000006000000...
3    size: 896    data: 3F80E7C33F80683400000006000000...
4    size: 896    data: 3F8254DC3F8204CE00000006000000...
5    size: 896    data: 3F8254DC3F8204CE00000006000000...
6    size: 896    data: 3F85917A3F8471CF00000006000000...
7    size: 896    data: 3F85917A3F8471CF00000006000000...
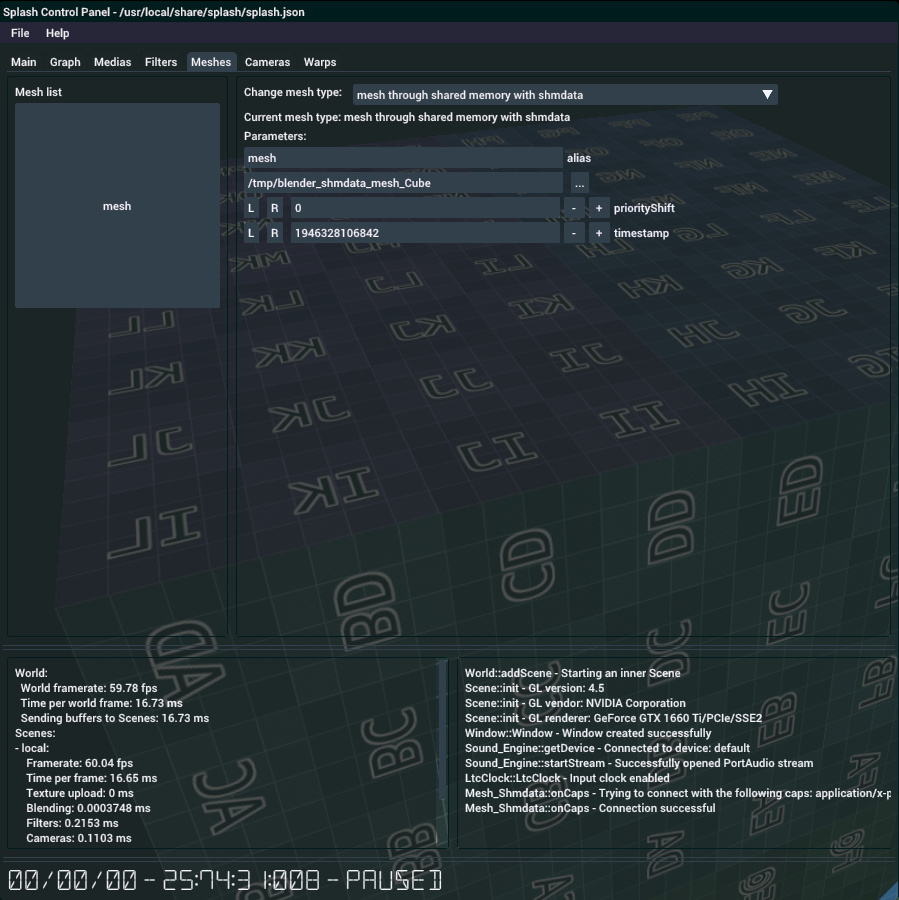
From there you can connect Splash to the shared memory. In Splash under
the Meshes tabulation, select a mesh and change its type from
mesh from obj file to mesh through shared memory with shmdata
(you might need to recompile Splash with support for shmdata activated).
Then type the path to the shared memory socket in the appropriate
section. After modifying/moving the default cube around in Splash, it
should appear in Splash.

Blender to Splash mesh live transmission#